

I wanted to share with you guys how I made these cool zippered throw pillows with scraps from my most recent custom quilt order. The main pros of this project are a] you get to quilt something without having to deal with making an actual quilt-sized quilt and b] the zipper is an easy but very professional looking detail. [Zippers aren't as scary as you think, I'll walk you through!]
Full detailed tutorial after the jump!
Full detailed tutorial after the jump!
A lot of people want to learn how to sew to save money on the things they buy. Throw pillows are one of the best categories in which to assert your thriftiness, because materials-wise they can be overpriced in stores. Take this pillow from Anthropologie, for instance. It is two squares of fabric connected by a zipper and filled with polyester fluff. It does not have any embroidery, piping, beading or other labor intensive work. It is $98. Why, Anthro, why??

These quilted pillows are a little step up from the basic throw pillow because the fronts are quilted with layers of batting and backing fabric to give them a little more softness and textural interest. The backs have zippers slightly offset from the side seam so that they don't get jammed up in the bulk of the quilted front.
The pillow front can be anything you want - it can be a quilt block you've wanted to try, or even just one solid square. You'll want it to be 1" bigger than your pillow in both directions. So if you're making a cover for an 18" pillow, you'll need a 19" square quilt block.
[I'm not including directions on how to piece this starburst design, because I'll be teaching it as a workshop at the 2013 Craftcation Conference. Come to Craftcation!!!]
For one pillow you will need:
-1 square of fabric or quilt block 1" bigger than your pillow form in both directions
-backing fabric 5-ish inches bigger than your quilt block
-piece of batting 5-ish inches bigger than your quilt block
-home decor weight fabric for back of pillow [1/2 yard for pillows 16" or smaller, 5/8 yard for pillows up to 20"]
-zipper that is 1" shorter than width of pillow [I shortened an 18" zipper to 17", there are directions!]
-thread
1. Lay your quilt backing fabric down, wrong side up, and tape down the corners, making sure the fabric is very smooth and flat. I just used a very inexpensive muslin because it's only going to show inside.

2. Place the batting on top, smoothing it nice and flat.

3. Now put your pillow front square on top, centering it on the batting. Again, make it nice and smooth.

4. Using curved basting pins, pin through all three layers in a grid with the pins about 3" apart. I like to start in the center and work out to the edges, smoothing as I go. [If you don't have curved basting pins, regular safety pins will work too.]

5. Quilt your pillow top. You can just sew a handful of straight lines at varying intervals down the front of your pillow. Or, sew diagonal lines. Or a grid. Or wavy lines. I dropped my feed dogs and used a darning foot to sew free-motion squiggles. The goal is just to attach all three layers together. So sew whatever you want, removing the pins as you go.

6. Once quilted, trim the pillow top back down to 1" bigger than your pillow, which should be the same size as your original pillow top [I trimmed mine to 19" square].

7. Now we will start on the back. From your backing fabric, cut two pieces as follows:
Piece A: Length: Pillow + 1", Width 3.5"
Piece B: Length: Pillow + 1", Width: Pillow - 1.5"
So for mine Piece A was 19" x 3.5" and Piece B was 19" x 16.5". The zipper is going to go between them.

8. This step is totally optional. Since I wanted the backs of my pillows to match the back of the quilt, I used a quilting weight cotton, which doesn't really have the best heft or body for a throw pillow. So I reinforced the inside zipper edges of the fabric with 1" strips of fusible interfacing. Also, at this point you'd want to finish the zipper edge of both pieces. I forgot to do this step so I did it later.

9. On piece A, mark 1" from the edge on both short ends.

10. Pin A to B, right sides together, aligning zipper edges.

11. Starting at the top of the seam with a 1/2" seam allowance, backstitch, sew 1" in to your first mark, then backstitch again.

12. Now set your stitch length all the way up so you are basting. Continue sewing all the way down the edge with a 1/2" seam allowance, basting all the way to your second mark at the other end. Stop at your mark.

13. Switch your stitch length back down to regular length. Backstitch, sew to the edge and backstitch again. Here's how each end should look when you're done. See the different stitch lengths and the backstitches?

14. At this point I went back and zig zagged along each raw edge of the seam since I forgot to do it earlier, holding the other seam allowance out of the way as I went. Just make sure you don't sew the two seam allowances together.

15. Press seam open. Again mark 1" in from each edge.

16. Now we will shorten the zipper. With it zipped, mark 1" up from the bottom closure, then sew back and forth across it a few times at the mark. Then trim off the extra. DO NOT use your fabric scissors for this.

17. Lay the zipper face down and closed on top of the seam, alinging the top and bottom ends with the 1" marks. Pin in place.

18. Now we're going to essentially sew a long and skinny rectangle around the zipper teeth and just outside our 1" marks. Switch to a zipper foot. Start at the bottom of the zipper just before your 1" mark, lining up the edge of the zipper foot with the center of the zipper. Do a backstitch and start sewing slowly along the zipper, removing pins as you go.

19. When you get close to the zipper pull, stop, crank your needle all the way down, and lift the foot. Unzip the zipper pull past the foot to get it out of the way.

To get the pull all the way past the foot, you may need to lift the presser foot even further by pushing and holding the lever up.

20. Once the pull is past the foot, put the foot back down and keep sewing until just past your other 1" mark. Stop, crank your needle down, lift the foot and turn your project 90 degrees counter clockwise. Lower the foot and sew over both ends of the zipper tape, making sure the second open side is straight and even.

Stop about 1/8"into the second tape, crank the needle down, and pivot 90 degrees counter clockwise again to line up the second edge. Now sew down the other side, making sure that the zipper teeth stay lined up with the center of the seam.
21. When you get close to the zipper pull again, stop, crank your needle down and pull the zipper pull past the foot the same way you did before, but this time re-zipping the zipper closed.

You will have to first finagle the zipper pull into the up position. Once it's past the foot, lower the foot and keep sewing.

22. At the final end, sew again just past your 1" park, pivot 90 degrees, sew across the end of the zipper, backstitch and pull it out.
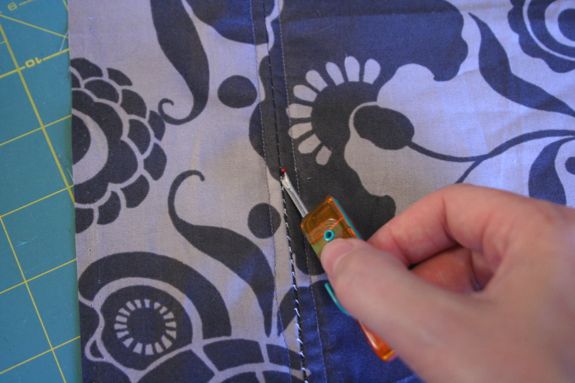
23. From the right side, use a seam ripper to pull out the basting stitches from the center of the seam. Remember not to rip out the first inch of sewing on each end. Pull out all the loose threads. There's your zipper!
24. Now the easy part - just sewing the front and back together. Lay your pillow top right side up, then lay your pillow back on top, right side down. Make sure your zipper is open so you can turn the pillow right side out later. Align and pin all edges.

25. Sew around all four edges with a 1/2" seam allowance, pivoting at corners and backstitching at beginning and end. Finish all edges with a zig zag stitch and clip the corners.

Turn right side up, pushing out corners and pressing all the edges. And there you have it! A quilted throw pillow on front...


It's *almost* as nice as the Anthro one!
ReplyDeleteOkay, it's nicer :)
Aww, pretty please include how to quilt this beautiful burst pattern? I don't have any way of getting out to Cali :( Maybe after your class?? *bats eyelashes* hehe. Beautiful tutorial! Maybe I'll finally gain the confidence to try a zipper now. :)
ReplyDeleteyes maybe after my class! ;]
DeleteThanks - I just used this to finish my 'Modern She Made' pillow. Easy to follow instructions - fantastic.
ReplyDelete