
Here is the tutorial I promised in Monday's post. Like I said then, when I was making my 3/4 circle skirt, there didn't seem to be many tutorials online for how to put one together after you figure out your radius. There are some great circle skirt calculators out there, but I'm talking about what to do after you calculate. If you know of any and I'm just missing them, feel free to link them up in the comments!
On my previous post, the By Hand London circle skirt app was mentioned in the comments, and it's awesome! They have 1/4, 1/2 and full circle skirt functions. They also have a few posts for what to do after, like attach a waistband and insert a zipper. But I wanted to expand on what to do in between - how to make a pattern piece and how to go about splitting up your circle into smaller sections to become the pieces of your skirt.
First, you'll need to calculate your radius. I used Patty the Snug Bug's calculator because she has a 3/4 column, plus it's a downloadable Excel spreadsheet so you can keep it on your computer and always have it. Plug in your waist measurement [make sure you're using the 3/4 column!] and then round your radius measurement to the nearest 1/4". My waist is 27", so my radius is 5.25".
PATTERNING
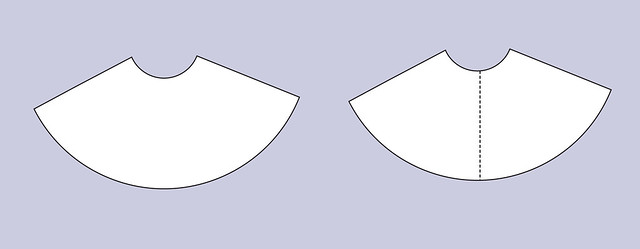
First let's talk about what a 3/4 circle skirt is. Just as the name implies, when it's flat, it looks like three quarters of a circle [aka an 8 slice pizza with 2 slices missing].

WHO WANTS PIZZA NOW?? *raises hand*
So, we need to fit that shape onto our fabric. If your fabric is wide enough, your skirt short enough, and your waist petite enough, you might be able to fit it on your fabric in one big piece. However, that is a lot of "if's"; it would also, in my opinion, be a huge pain in the booty, because you'd have to draw a giant circle very accurately. It's a lot easier to be accurate when you're working with smaller pieces.
So, since we have a front and a back, we'll divide the shape in half: half for our front, half for our back.

I did a center back zipper for a few reasons - sometimes I don't like how zippers hang on side seams, and I also wanted to easily add side seam pockets. So for a center back zipper, we need to divide one of those halves in half again.
So here's an overview of how our skirt will go together. Two quarters in the back joined by a zipper, and two quarters in the front cut in one piece.
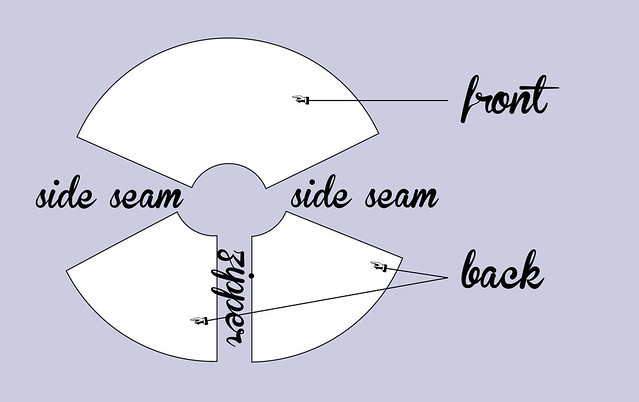
[At the risk of being confusing, I want to clarify - I'm dividing the skirt into four pieces, so I'm calling them quarters, but they aren't quarters of a full circle, they are quarters of a 3/4 circle.]
Now, we want to make our pattern pieces as quickly as possible using as little effort and pattern paper as possible. Or at least I do. Call it lazy, call it efficient. Call it, let's just get to the sewing part already. So we are going to make just one paper pattern piece to fulfill our requirements.
But first, we math!
Our friend geometry will help us figure out how long the upper curved edge of our piece will be. Here we go:
1. First we need to figure out the circumference of the circle of which our 3/4 circle is a part [the purple ring]. The circumference of a circle is 2 x pi x radius. So, multiply your radius by 2 and then by 3.14.
2. Now we need to find out what 3/4 of this circumference is [the pink ring]. So multiply the result of step one by .75. To keep things simple, round to the nearest 1/4".
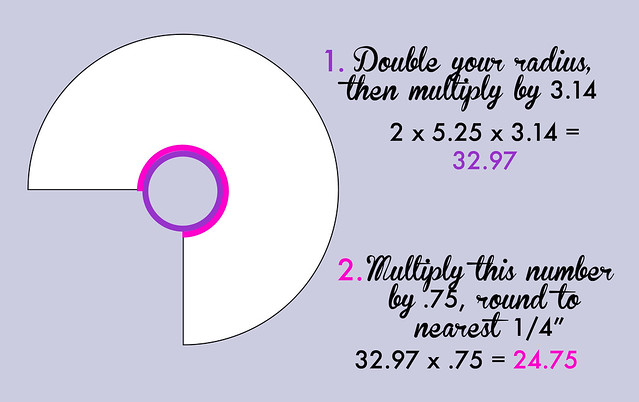
[Note: I'm using my radius of 5.25" - make sure you use your own radius measurement!]
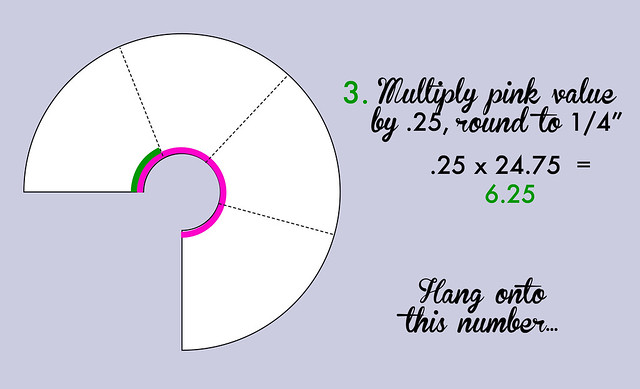
So now we know the total length of the top curved edge of our 3/4 circle skirt. Next we need to figure out what a quarter of it is [the green line in the next drawing] so we can break our skirt into four pieces.
3. Multiply the total length of the 3/4 circle skirt edge by .25. Round to the nearest 1/4". Remember this number. Mine is 6.25".
Now that we have our numbers ready, it's time to draw the pattern piece.
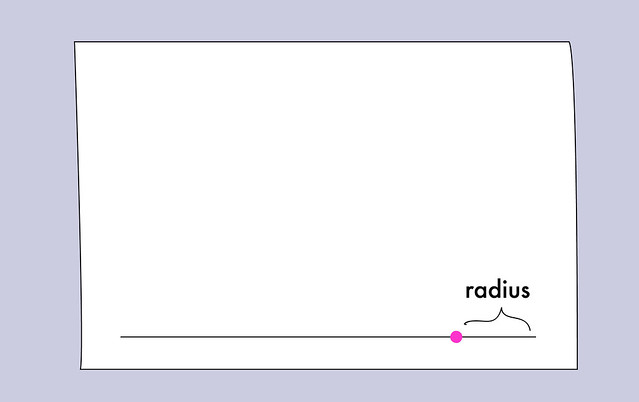
On a large piece of paper, draw a straight line with a yardstick. Mark out from the end the distance of your skirt radius. This is the number that the circle skirt calculator gave you in the beginning.
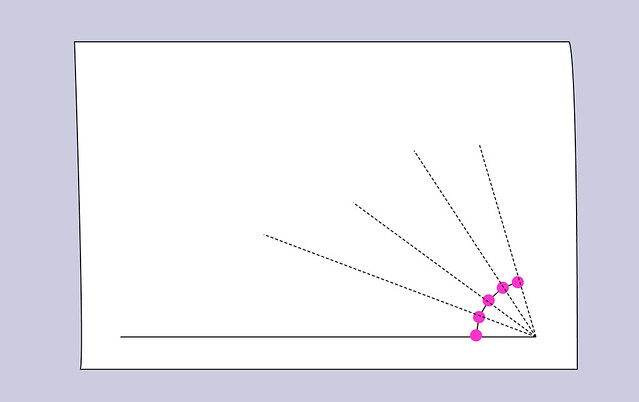
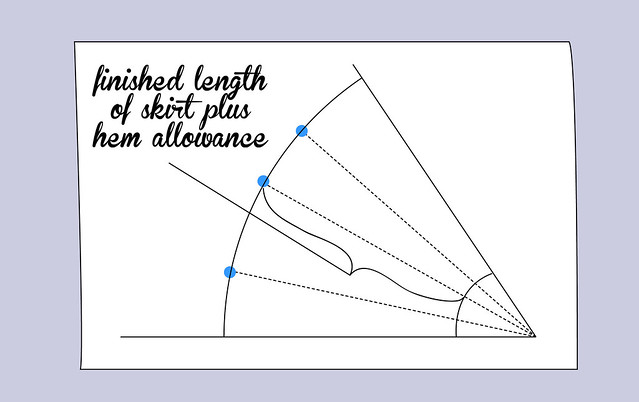
Now start marking points, rotating the ruler a little between each one, measuring out from the end of the original line - I'm going to call this the axis - and marking the skirt radius point. Make sure the end of your ruler is always on axis as you're measuring. Mark enough points to draw a curve. [The dotted lines show ruler placement.]
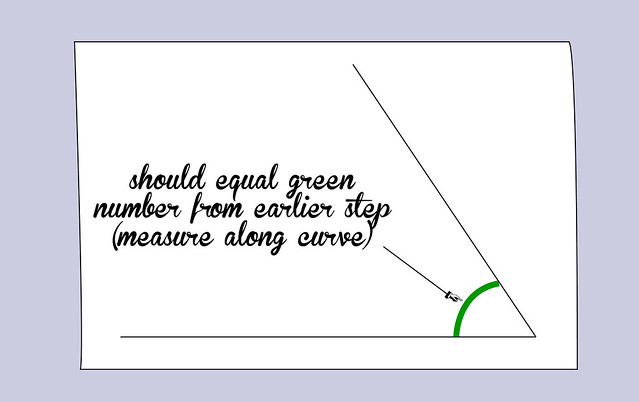
Keep going until your curved line measures the value of the green line we figured out earlier. Use a tape measure or other flexible tool and measure along the curve. At that point, draw another straight line from the axis out through the curved line.
Now determine what you want your finished skirt length to be, and your hem allowance, and add them together. My skirt was 20" and my hem allowance was only 1/4" because I hemmed with bias tape. So for the next step I was measuring 20.25".
Using the same procedure as above, measure your skirt + hem distance away from the first curved line, marking points and connecting into a curve. Make sure your ruler is still going through the axis with each mark. I like to use a yardstick and keep the 0 end out at the hem; every time I rotate and mark, I make sure that the skirt + hem measurement is even with the curved line, and the yardstick is also passing through the axis.
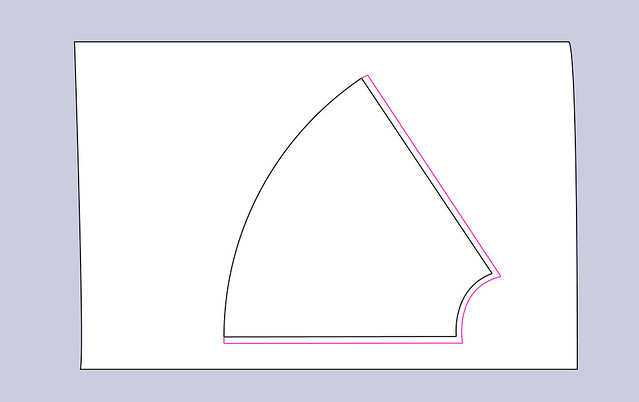
The last thing to do is add our seam allowances. You can use whatever you think is easiest. I did 3/8". Use a ruler to add your seam allowance amount to the straight edges and the smaller curved edge. Whatever seam allowance you choose, write it on your pattern piece so you don't forget.
Then cut out your pattern piece.
THE PROTRACTOR WORMHOLE
If you have a protractor and you know how to use it, you can skip most of the preceding steps. Draw a 67.5° angle on your paper [67.5° is 1/4 of 270°, which is 3/4 of 360°]; that angle sets the outer bounds of your pattern piece. Measure the skirt radius points, then the skirt + hem points, and add seam allowances.
CUT THE FABRIC
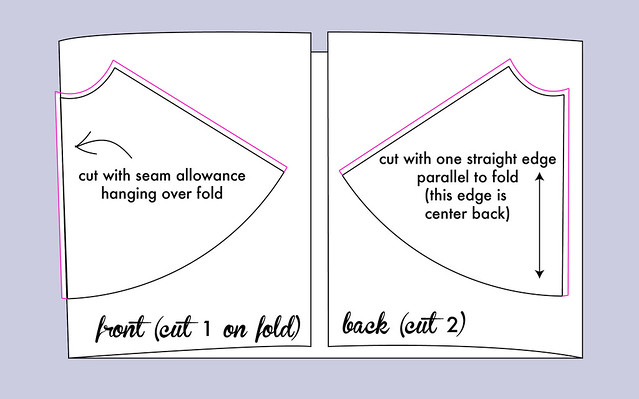
So here's how we're going to cut our fabric using only one paper piece. Depending on the width of your fabric, you may have to open it up and refold it the other direction to get your pieces to fit.
For the front, cut one piece on the fold, letting the seam allowance of one straight edge hang over the fold. You can also crease back the paper if that's easier. After cutting, notch your center.
Then, use the pattern piece to cut 2 backs, with one straight edge parallel to the fold/selvage. This edge is the center back. Mark it on both pieces.
You'll also need a waistband. Here is how you figure out cutting dimensions:
LENGTH: waist measurement + 1" + [2 x (seam allowance of back seam)]
WIDTH: [2 x (desired finished width)] + [2 x (seam allowance of shorter curved edge)]
Notch the center of the waistband's long edges.
SEW THE THING
Staystitch upper curved edge of skirt pieces. [This means stitch through a single layer 1/8" smaller than your seam allowance.]
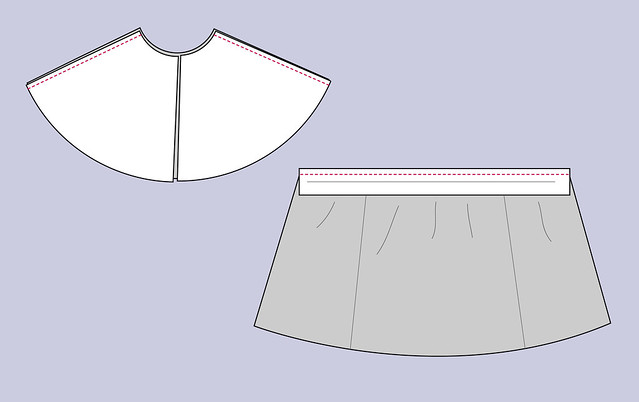
Stitch skirt backs to skirt fronts at side seams, right sides together. Finish and press open.
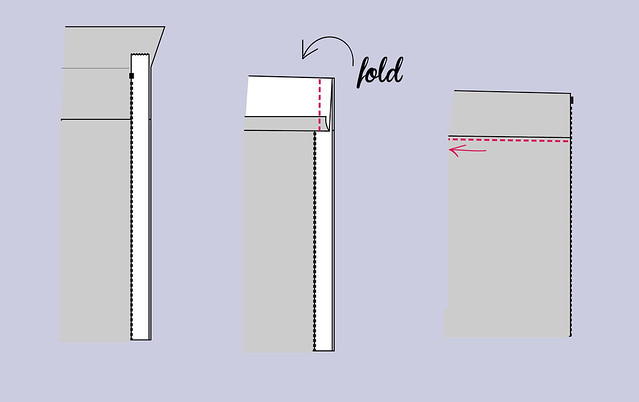
Interface waistband. Fold in half lengthwise, wrong sides together, and press to crease. Reopen. Pin one long edge of waistband to top edge of skirt, right sides together, matching ends and center front notch, and easing the skirt in to fit the waistband. Stitch together and press seam allowance up.
Install invisible zipper on back center seam with zipper stop just below crease in waistband. Stitch the rest of the seam, finish and press open. [Here is an invisible zip tutorial if you need help.]
Press raw edge of waistband a scant seam allowance to the wrong side. [ex. if your seam allowance was 1/2", fold it a teeny less than 1/2" and press]. Fold waistband around zipper, right sides together. Use a zipper foot to stitch waistband down along zipper. Make sure bottom of waistband stays folded when you stitch over it.
Clip corner and turn waistband to inside. Pin all the way around, covering waist seam allowance, and then stitch in the ditch from the outside to secure waistband on the inside.
Let your skirt hang overnight, then hem as desired.
I hope that was helpful! If there are any parts that need clarification, please ask in the comments.
Thank you for this clear tutorial! and I want pizza too :)
ReplyDeleteThanks so much for the helpful tutorial! I'm generally ok with teh maths of making a circle skirt but was struggling with making the pattern pieces! This is definately being pinned fr future reference! :-D
ReplyDeleteoh wow that led into complicated maths! I've never calculated a circle skirt before so that kinda blew my mind
ReplyDeleteAwesome tutorial! Thanks so much for doing this for 3/4! I've used the BHL app for full circle skirts, and although I really wanted to make a 3/4, I was just unsure of how to do it.
ReplyDeleteThanks for such a thorough tutorial - calculating and drawing out circle skirts is the kind of thing I always think I should be able to do but get slightly intimidated by so it's great to have a helping hand!
ReplyDeleteMuito bom! very very good! many thanks. :*
ReplyDeleteMmmmm....Pizza! Oh, wait, skirt! Yes, skirt. Must make pizza and skirt.
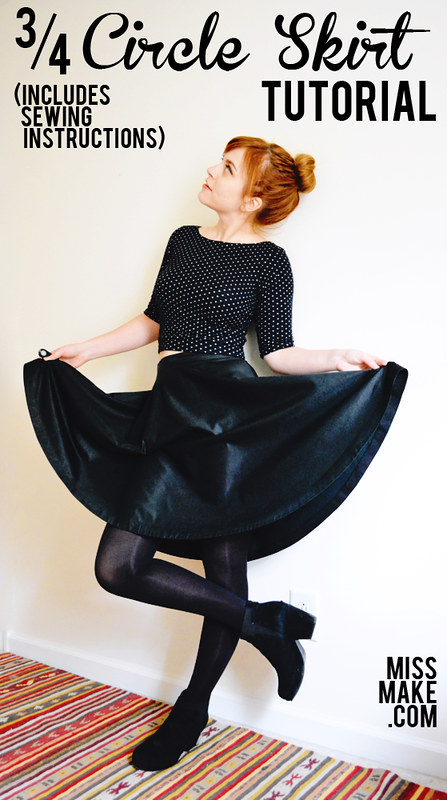
ReplyDeleteThis is the cutest, thanks for the tutorial! Any chance you could also post a pic of the skirt when you're not holding the sides out? I'd love to see how it drapes.
ReplyDeletethanks! if you click on the first link [text is 'Monday's post'] it goes to a previous post with a bunch more pictures, and there is one from the front and the back of me just standing.
DeleteLove your photo and great step by step instructions! Great site!
ReplyDeleteThis comment has been removed by the author.
ReplyDeleteExcited to be trying this! I just cut my fabric and forgot the hang the seam allowance of the fold for the front piece. Should I just cut 1/2" off of one side of it? That's what makes sense in my mind, but I want to double check to make sure that wouldn't mess anything else up. Would love your advice!
ReplyDeleteHmmm...was your seam allowance 1/2"? If so, you'll actually want to trim 1" total from the front, since when you cut it the fabric was doubled over, so really you added 1/2" twice. I would split it up and trim 1/2" off each side seam edge. If you cut all of it from one side seam, then you're shifting the grainline of the center front a little bit, and it might hang kind of funny. I hope that makes sense!
DeleteSearched some more & I found the Snug Bug Calculator, YAY! Think I figured out my mistake. I was figuring for a full circle skirt, not a 3/4 circle skirt : / Duh! Thanks for your time, Devon :) --Leca
ReplyDeleteoops. Think my first post did not get published ?? Apparently I'm as computer challenged as I am math challenged! Please disregard my above post. Sorry! --Leca Moose
ReplyDeleteHow do I figure out my radius? Is it my circumference (waist measurement) divided by 3.14 then divided by 2? THANKS!
ReplyDeleteYes that is how! Also if you're using the Snugbug calculator, it will figure it out for you.
DeleteIf your waist is 27" and your radius is 5.2 then the answer to the 1st calculation i.e circumference of full circle (purple) value should be 27" right? how did it become 32.97?
DeleteThis comment has been removed by the author.
ReplyDeleteI have a silly question about excel part. What does adjust waist measurement meant? I don't get it... I understand there is actual waist measurement to get the radius but I do not understand the adjusted one from the excel. Do you mind explain to me that one? Also what is the green part of worksheet "regrading" What is that for?
ReplyDeleteThe waist measurement is adjusted because the circle edge of fabric will stretch out as you work with it, so the adjustment compensates for that. For the other questions, it's probably better to ask Patty (SnugBug) on her post about it since it's her worksheet. :]
DeleteYes but her excel was not found at first when I clicked your highlighting link.... I had to google it and found her excel file directly from search which it forced to download the excel file, not from her website so how do I contact her? Just wondering about that. That is all.
DeleteBy the way, your posting is wonderful and very visual for me to see the steps which it was helpful! :)
DeleteHi Devon
ReplyDeleteThis is a great tute - I had forgotten about it (I follow your blog) and your sewalongs...) - so clear! I've been trawling the web because I'm making a Monefa with a circle skirt from a McCall's pattern - and my fabric is really wide. Do you think seams would stabilise it? Because I could actually cut it out seamless. It's a 2 way lightweight merino knit with no vertical stretch at all. I'd really appreciate your advice...
Hi! Thank you so much! So I think that's really good thinking about the stability - since your fabric is only stretchy one way, the weight of it will probably make it hang longer at the crossgrain. So you'll have either a long front and back or long sides. If it were me, I would cut it in two halves, and put the non-stretchy grainline at center front and center back. Then the two side seams will be where the fabric is stretchiest, so if you sew them together there it will help keep them from stretching as they hang. You could even just use a regular straight stitch (maybe start that about 1/4 way down so the top part of the seam is still stretchy). It still might hang a little weird though, so I would try it on before you hem and trim any parts that are kinda droopy.
DeleteAlso if it were me, the thought of trying to accurately cut an entire circle in one piece would fill me with much pre-laziness that I would cut it in two pieces anyway just to make things easier. :] Hope that all helps, it sounds like it's going to be really cute!!
You angel, thank you so much for replying - and so quickly! Everything you say makes total sense, and that tip about sewing the seam partly stretch from the waist down is such smart thinking. I must say my mind was boggling a bit at the thought of the cutting so I am relieved:).
DeleteI'm actually channelling a bit of an Audrey Hepburn vibe - I hope - as I've changed the neck to a boat, except the front is a bit V - it's a McCall's pattern for knit top - like a hide wide V. Parakeet green.
You are my hero. I am off to follow your advice stat!
This comment has been removed by the author.
ReplyDeleteThis comment has been removed by the author.
ReplyDeleteHello Devon ... I was wondering, could I make the skirt with an elastic waist band? I haven't put a zipper into a skirt since high school, (and that was over 30 years ago). Great tutorial ... the visuals will be a big help, if I ever get around to making this! Thanks!
ReplyDeleteThanks for this excellent tutorial! I'm thinking of adding a circle skirt to my By Hand London Anna bodice but can't decide on half, three quarter or full. Could you please update your link to the circle skirt calculator tho; it's moved to http://thesnugbugcollective.com/2011/08/circle-skirt-calculator-for-the-drafting-of-full-half-and-34-skirts-with-bonus-grading-worksheet/ :)
ReplyDeleteSo I made a half-circle skirt and I hate it. How can I adjust it to an aline?
ReplyDeleteCan't wait to make my new skirt (or three)!
ReplyDeleteAbout how much fabric did you use for your skirt?
Hey! When attaching the waistband to the body of the skirt, do you sew in a straight line, or follow the curve of the body of the skirt? (The picture is unclear.) Thanks!!
ReplyDeletePatty the Snug Bug's calculator link doesn't work anymore :(
ReplyDeleteLadyJai
Jamie Dement
Caring for my Veteran
This is the clearest tutorial I've seen for making a 3/4 circle skirt! Thanks very much!
ReplyDeleteThanks for the tutorial. The process is really clear but I do have a question....
ReplyDeleteIf the purple circle is my waist circumference then wouldn't the pink ring be too small when made in to the waist of the skirt?
hi, I cannot get into patty the snug bugs calculator. my waist is 30" so I'm coming up with a radius of 4.8. the number you use at the beginning is 5.25 but that doesn't make sense if your waist is smaller than mine. I must have missed a calculation. Can you help?
ReplyDeleteps... I really want to make this instead of having one complete circle because I want a center back seam and side seams for pockets!!!
thanks