

After finishing Version 1 of the Colette Moneta, I was totally in love with the dress except for one thing.
I had a major case of armhole gape.
This is not an uncommon problem for me. Armhole gape tends to afflict more cylindrical figures - meaning, narrow shoulders/ribcage but a fuller bust. If I gave my dress to another person that had the same bust measurement, but a wider ribcage and smaller bust [imagine a more oval cross-section than a round one], it might fit them perfectly. It is just a simple fact that different pattern brands fit various physiques differently. One of the joys of sewing is learning how to adapt them to fit your specific body shape.
So what can we do about armhole gape? When working with wovens, it's not really a biggie at all. You can pinch out the excess at the armscye, then transfer it to a bust dart as detailed in this tutorial.
After searching online, however, I couldn't really find much info about how to fix armhole gape without involving any darts, i.e., on knits. While I could have added a side dart, I really wanted to do it without.
So below is a tutorial for how I got rid of my armhole gape without adding a dart.
I'm sure there are multiple ways to do this. I'm not sure if this way is 'textbook' [probably not], or at all the best way to do it, but it's what my brain came up with. If anyone has any ideas or suggestions that are less convoluted, more logical or even just prettier, I'd love to hear in the comments!
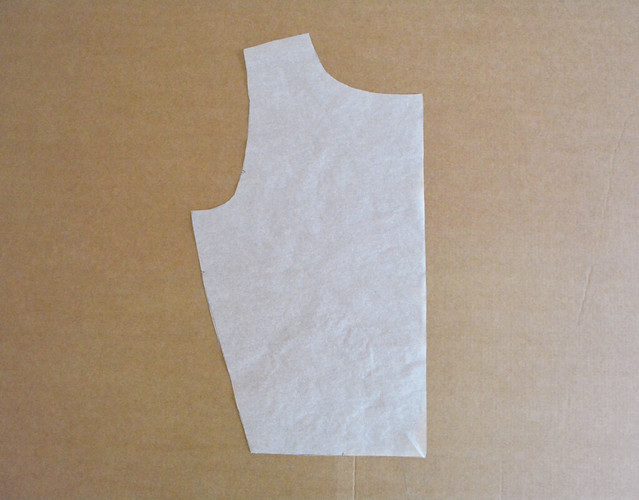
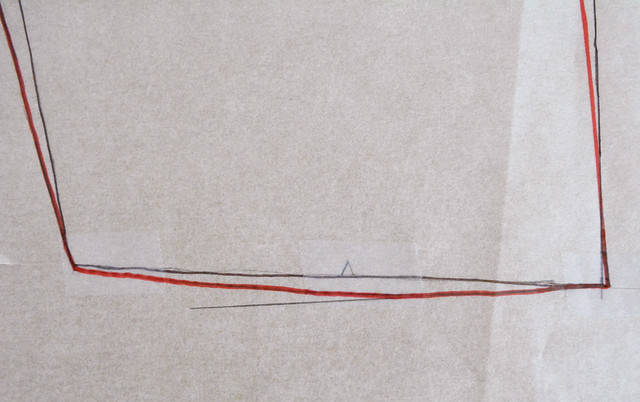
First, let's talk about the fit. Here's a picture of the finished dress again, without the text:

You can see that there is a lot of extra fabric around the front of the armscye. [I failed to take a picture of the back, but the back fit very well.]
The first thing to do is the pinch out the extra fabric at the front of the armscye. It will naturally want to form a little dart there. Pin that dart in place.
My center neckline was also gaping in the front, so I pinched and pinned that a little as well.

Ah! Already so much better.
Now mark the pin placement with a marker and unpin.
I'd highly recommend tracing your front bodice pattern piece off to do the alterations. It takes about a minute, and if you end up making a mistake or want to start over later, you'll thank yourself. You can get rolls of tracing paper at art supply stores.
Using the pin marker dots, trace the dart onto your pattern piece. Remember to account for seam allowances when lining things up, and use your ruler to make the lines nice and straight.
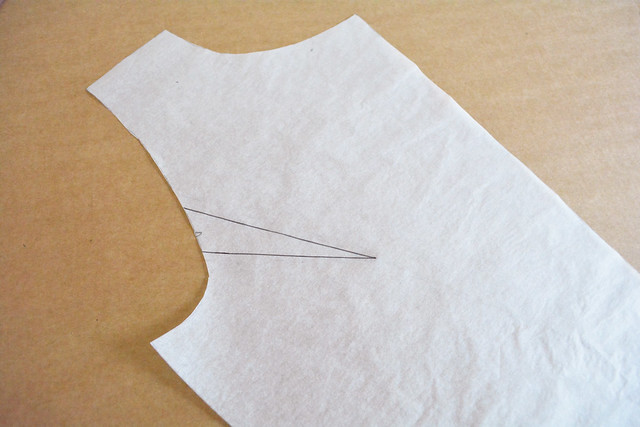
Now, draw a line from the apex of the dart to the bottom center front corner.

Cut out your dart.

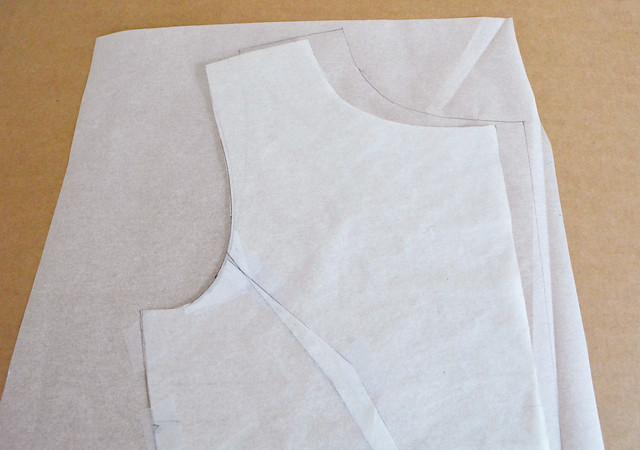
Now cut along the line almost all the way to, but not through, the end. You want to leave a little uncut so you have a tiny hinge of paper:

Now move the pattern hinges to overlap slightly so that the end of the dart at the armscye line up. Tape in place.

[I know this is a little weird because ideally, you'd line up the dart legs, but we shall not worry about it now and will address it later.]
Tape some paper under the armscye. Use a curved ruler to redraw the line smoothed out, averaging the jagged edges.

Trim.

Trace the original bodice pattern again, but don't cut it out yet. Place your altered pattern piece on top and line up the side seams.
Trace around the armscye, shoulder and neckline. [For some reason my red sharpie was bleeding into the tracing paper like nobody's business. Please excuse.]

Use your ruler and draw a new center front line from the end of your new neckline to the original bottom center front.
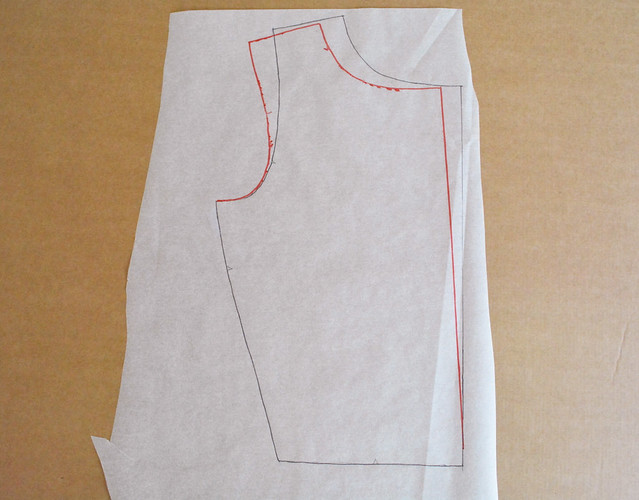
Now, by this point we have decreased the ease across the bust - a little when we overlapped the dart legs, and a little just now when we redrew the center front line. I definitely did not want to do that, as it was quite fitted there already. So to add the ease back in, redraw the side seam. You can put the paper over the original pattern piece to see the width there to help you see about how much to add back in.

Almost there. Now we just have to deal with the bottom edge. Use a ruler to draw a pencil line that is square [90 degrees] to the new center front line.

Use a curved ruler to blend a new bottom line from the side seam to the squared line.
Now cut out your new pattern piece [make sure you follow the new lines!] and label it.

At this point to account for the neckline gape, I drew another new center front line that took some from the neckline edge and blended back to the original line down at the bottom. I didn't seem to get a picture, but it's pretty simple!
You can see pictures of the dress finished with updated armscyes here.
I hope this was clear enough and helped you out a little! A few things to note:
- If you make version 2 and 3, remember that you must also alter the sleeve piece to reflect the changes you made the the front bodice. I haven't done that yet so as of now no tutorial [I'll update this post if I do one.]
-If you change the neckline, you'll have to also change the collar piece to match.
Again I'd love to hear any other suggestions, ideas or ways to do it differently [or better!], so please, comment away!
Awesome! Thanks for sharing. I'm slowing learning the art of pattern alteration, and figuring out what adjustments I generally have to make for myself.
ReplyDeleteThank you, thank you, thank you!! I ran into the exact same issue and, also, searched and searched online for a solution....to no avail. I can barely wait to give your fix a try.
ReplyDeleteWhat a great tutorial! I suffer from this problem too. I fix it by decreasing the side seam most of the time. But I should give this a try!
ReplyDeleteI am not an expert, but I am guessing you used your full bust measurement to find your sizing for the bodice. This is the most common error for fitting if you have more than a B cup. Your upper bodice is too large, hence the arm gap. If you take your upper bust measurement, then do a full bust adjustment - which is a lot easier than you think it is at first - you will have a better fitting garment. This is still true with knits. You will have less wiskering around the bust when your bust fits well, and less width on the upper bust.
ReplyDeleteYour method works, but only if you do the sleeveless version. If you add the sleeve, the armscye will not fit. If you do the method of using your upper bust measurement and FBA, you would then not have the sleeve alteration to do as well.
Hi Leah! Thanks for the tips. :] The difference between my upper and full bust is 2", give or take a little bit, so I don't usually do a FBA. In this case especially too since Colette drafts for a C cup. But maybe I should give it a try as an experiment!
DeleteI tried Leah's method of cutting the smaller size and doing an FBA (I used this tutorial because the bodice was fitted: http://dixiediy.blogspot.com/2011/12/never-fear-knits-ballet-dress-sew-long.html) and the armhole gape is gone. I'm not sure I understand exactly why it worked but I am grateful to both of you for fixing my fit issues!!
DeleteHow helpful! Thanks ☺
ReplyDeleteTaht might seem like a stupid question, but after modifying the pattern, did you use your front bodice piece and trace your updated pattern on it? Or did you have to cut another front bodice? My point is, if you've already cut your fabric, is it easy to alter what you've cut, or would you recommend buying twice as much fabric as recomended just in case this kind of thing happens?
ReplyDeleteI had to recut it because it's a different shape than the original. And also I personally hate doing alterations so I'd rather just make a new bodice! :] I usually buy a little extra fabric just in case anyway, and redoing the bodice only took about an extra 1/2 yd.
Deleteoh dude thank you genius lady!!
ReplyDeleteI've been having this problem lately with my sleeveless knit bodices and I haven't been sure what to do about it. I'm good with transferring gappage to existing darts on wovens, but as you say, putting a dart in a knit isn't a great solution. This solution looks great! I've seen the advice around to choose a size based on the upper bust measurement, which I'm sure would help me because my upper bust is significantly smaller than my full bust, but most patterns don't include an upper bust measurement in the size chart, so I'm not sure how I'm supposed to do this. Until someone explains that one to me or I puzzle it out on my own, I'm going to use this method because it looks great!
ReplyDeleteYou use your actual upper bust measurement as your bust measurement. (my upper bust is 36, my full bust is 41, I would buy the 36 bust pattern and adjust my pattern) Look up/seach full bust adjustment (FBA) for complete directions and diagrams on how to do this on your pattern before cutting out your fabric. It changes just the bust without changing the waist, neck, shoulders etc. It works with all fabrics.
DeleteJust use the normal bust measurement on the pattern...so I measure my upper best measurement & it is 31.5"..so I pick a pattern size for a top or dress by that bust measurement on the pattern (8 on most patterns) My full bust measurement is about 35". I cut out the size 8 pieces & do a tissue fitting and from that work out how much a full bust adjustment I need to do. I learnt to do this from the Palmer Pletsch book 'Fit for Real People'...changed my sewing life! :)
ReplyDeletewoops, I meant 'bust', not 'best'!
ReplyDeleteThank you so much! I've been having the same issue of armhole gaping with my moneta. I've been too lazy to fix it, but this looks easy! :D
ReplyDeleteThis comment has been removed by the author.
ReplyDeleteSure! The only thing we did to the side seam was curve it out a bit more, so it's small enough that you should be able to ease it into the back side seam. If it's a more drastic change you could always take a little off the bottom of the front side seam and redraw the bottom edge, or add a bit to the bottom edge of the back side seam. But in my case the two edges eased together very easily.
DeleteHello I run into this problem a lot in my classes but we do the alterations at the drafting stage BEFORE even the mock up is cut. A tell tale sign is the back shoulder measurement; if it is smaller than the pattern then an adjustment on both the front and back is necessary for a better fit. There are some pretty neat tricks that can be done just by using the measurements as a guide. Unfortunately they are too technical to get into them in this forum but I would be happy to share this knowledge with anyone who wants to know. Thanks for the opportunity of expressing my opinion keep up the good work!
ReplyDeleteMaria
I am making a Moneta with sleeves and have a similar build and similar issue w/ armhole gape on rtw. Have you found any adjustment necessary on the sleeved versions?
ReplyDeleteit happened for me on the sleeved versions as well, but it was a lot less noticeable. on one version, i redrew the front bodice armscye line to cut a bit of the excess off [so i didn't do any dart pinching] but didn't change the sleeve, and i was able to ease them together without a problem. this did minimize the extra fabric a bit.
ReplyDeleteThanks. I made up my top and it's less noticeable with the sleeve attached but I'd like to correct it for future sleeved versions (ideally without redrafting the sleeve which is beyond my skills)
DeleteGreat tutorial! I don't usually have this problem, but really good to know if I'm sewing for others.
ReplyDeleteGreat tutorial - so interesting, but I'm sewing the Moneta and made a muslin of the bodice and tried it on .... saw the gaping, and googled "gaping front armhole in knits" and was shocked that this tutorial was for the exact.same.pattern. Interestingly, I have a small bust and it still gaped.
ReplyDeleteWorked really well on stylearc's Diana pattern. Thanks for sharing!!
ReplyDeleteso glad to hear!! thanks!
DeleteIMO the bodice on this garment is too wide for you. Evidence is in your final photo with the vertical wrinkles that run from the bust to the neckline after your adjustments. It does not skim you like the pinned adjustment. I would have done a narrow shoulder adjustment first. That would have maintained your grain and left the armhole without any distortion and need for redrawing., Then if there still was a gape, I would have rotated the dart you pinched out in the armhole to the sideseam and then eased that excess in. Easier and would have maintained the grain with no effort and it would eliminate the remaining wrinkles in the upper bust. For a great narrow shoulder adjustment goggle Ann Rowley's narrow shoulder adjustment, so easy. Then search rotating darts. to deal with the armhole gape. Sometimes the hardest part of altering for fit is understanding which adjustments need to be made. I have narrow shoulders like you and do this narrow shoulder adjustment to every pattern I make as I pull it out of the envelope. Making muslins, I know, yuk, would help immensely to work out the fit before cutting into your pretty fabric. You would need a knit muslin for a knit fashion fabric. Great effort!
ReplyDelete