Showing posts with label recipe. Show all posts

Wednesday, July 2, 2014

Grapefruit and Rosemary Champagne Punch

grapefruitrosemarypunch2

It's been forever since I've posted a recipe, mostly because I've been doing a ton more sewing that I ever have and nothing really interesting in the kitchen. But I thought that as we approach the glorious holiday weekend ahead, a time of barbecues, parties and drunken encounters with recreational explosives, what better time to share this champagne punch recipe with you?

There is nothing patriotic about this punch. In it you will find no red, no white, no blue. But it is so good that you just might drink the entire dispensers worth [with help, of course...or not?] and then make a mid-party run to the liquor store across the street just so you can mix up another batch.

And maybe it could help fuel your oonapalooza sewing??

grapefruitrosemarypunch1

I originally made this for my pal Christine Haynes' latest book party, and it was quite a hit. It is so refreshing and delicious and bubbly and has that best/worst quality of a good punch where you feel like you're not drinking but oh you are drinking. I made it right before but it would probably be extra good if you mixed everything but the champagne and let it steep overnight in the fridge. If you're serving it outside, you could freeze the grapefruit slices before adding them to keep it cool. Adjust the gin amount to make it more or less boozy.

So mix up a batch, set up your lawn chairs, and have a safe and fun holiday weekend!

Grapefruit and Rosemary Champagne Punch
1/2 1L bottle tanqueray [about 2 cups] or gin of choice
1 bottle Simply Grapefruit juice, chilled
2 bottles champagne of choice, chilled
1 batch rosemary simple syrup [recipe follows]
1 cut up grapefruit and rosemary sprigs for garnish

Mix gin, juice, cooled simple syrup, sliced grapefruit and rosemary in a large punch bowl or drink dispenser. Pour in champagne and mix gently. Enjoy!

Rosemary Simple Syrup
1 cup sugar
1 cup water
handful rosemary sprigs [3-4 large sprigs]

Mix water and sugar in a saucepan and bring just to boiling. Remove from heat and add rosemary. Let steep until cool. Remove rosemary and refrigerate until use.

Sunday, September 30, 2012

Pumpkin Spice Cupcakes with Maple Cream Cheese Frosting


It's pumpkin season again!! All is right in the world.

I made these cupcakes for the Colette Patterns fall launch party at Sew LA, and they were a hit. They turned out really full of pumpkin-y spice delicious flavor, and the frosting is a nice compliment. Rumor has it I've had one for breakfast the last three days in a row. I will neither confirm nor deny.


The fancy pants edible gold glitter is something I found at my most-convenient-but-not-favorite grocery store Albertsons. Cake Mate Cupcake Gems. Who'da thought. You've earned one point, Albertsons.


Notes before you make: These cupcakes were for a crowd, so this recipe makes 36 of them. Yes it's a lot. But no you won't be sorry. The frosting is a little on the soft side, so it wouldn't be the greatest for piping. Also there will be a little extra left over. I'm sure you'll find a use for it...


Pumpkin Spice Cupcakes
makes 36
Ingredients:
3 cups plus 2 tbsp flour, sifted before measuring
1.5 tbsp baking powder
3/4 tsp baking soda
3/4 tsp kosher salt
2 tsp cinnamon
3/4 tsp ground ginger
1/2 tsp ground nutmeg
3/4 cup unsalted butter, softened
2 cups sugar
3 eggs, beaten until frothy
1 15oz can of pumpkin
1 tsp vanilla
1.25 c milk

1. In a medium bowl whisk together all dry ingredients except for sugar.
2. In a large bowl, beat butter for 30 seconds. Add sugar and beat until fluffy.
3. Add eggs and vanilla, beat. Add pumpkin and beat until combined.
4. Add flour mixture and milk in alternating amounts, beating after each and ending with the flour. Fill cupcake liners 2/3 full and bake for 22-25 minutes at 375 degrees.
5. Cool completely and frost liberally with maple cream cheese frosting.

Maple Cream Cheese Frosting
Ingredients:
2 8oz packages of cream cheese, softened
1/2 cup unsalted butter, softened
1/2 tsp maple flavoring
1/2 tsp vanilla
generous pinch of kosher salt
4 cups powdered sugar

1. In a large bowl, beat cream cheese and butter until combined and fluffy. Add everything else and beat until well combined.

Friday, August 10, 2012

Coconut Flaxseed Banana Bread


Despite a blazing heat wave and multiple earthquakes rolling through Los Angeles on Wednesday, I decided to turn on my oven and bake banana bread.

Because when you have two overripe bananas sitting on your counter, that's just what you do.


I was feeling a little experimental so I decided to add in a few odds and ends of ingredients that were almost gone and just needed to be put out of their misery. All of my subs actually made things pretty healthy. I added some ground flax seed for fiber and superfood omega acids. I used all coconut oil instead of butter or vegetable oil, which is a much better fat. I also added some protein rich nonfat greek yogurt.

But then I added a buttery pecan streusel topping.


Whoops.

Like all banana bread, this was way better the second day. Everything just sets together and moistens and the streusel topping kind of absorbs into the rest of the bread and doesn't just crumble off when you try to cut it. But I understand if you don't have the patience to wait a full day, and you try to eat it right out of the oven. Because that's what I did.

Coconut Flaxseed Banana Bread with Pecan Streusel Topping
[makes 1 loaf]
Ingredients:
2 cups flour
1.5 tsp baking powder
1/2 tsp baking soda
1/4 tsp salt
1.5 tsp cinnamon
1/2 c ground flax seeds
1/2 c shredded unsweetened coconut
2 ripe bananas, mashed
1/2 c greek yogurt
2 eggs, beaten
1/2 c coconut oil
1 tsp vanilla
1 cup sugar
1/4 c milk

For topping:
1/4 c packed brown sugar
3 tbsp flour
2 tbsp butter
1/2 c chopped pecans

1. Mix flour, baking powder and soda, salt, cinnamon, flax, and shredded coconut in a large bowl. Set aside.
2. In medium bowl, mix bananas, yogurt, eggs, coconut oil, vanilla, sugar and milk. Pour wet ingredients into dry. Mix gently until just combined. Pour into greased loaf pan.
3. For topping, mix brown sugar and flour in a small bowl. Cut in butter with a pastry blender or fork until mixture is course and crumbly. Stir in pecans. Spread on top of batter in loaf pan.
4. Bake at 350 degrees F for 1 hour, or until toothpick inserted in center comes out clean. Let cool in the pan for 10 minutes, then on a rack. Once cool wrap in plastic wrap and store overnight. Slice and enjoy the next day.

Tuesday, May 8, 2012

Easy Broccoli Soup


It's been sooo long since I've posted! I've been very, very busy working on a few different exciting things, hopefully which I finish soon and can share with you!

In other news, I recently signed up to get a Farm Fresh to You box every other week. It's a CSA [Community Supported Agriculture] box chock full of local organic produce that gets delivered to my doorstop every other week. You never really know what you're going to get, but you can check off things you prefer not to get on their website.

I received my first box last week. I ordered the smallest box, and it came with a giant onion, two  oranges, one lemon, two apples, two artichokes, a big bunch of butter lettuce, two huge heads of broccoli, and four baby bok choy. It's really pretty great and worth the [very reasonable] $25 considering that it just shows up on your doorstep and it's all local and fresh. Oh also it all tastes really, really good.


So with this arsenal of fresh produce at my fingertips, here's what I made for lunch today. It was kind of a cold, dreary morning here in Santa Monica, and a steaming bowl of homemade soup sounded just about perfect. It really hit the spot, and I have to say it was a pretty great way to get my veggies.

P.S. If you don't have an immersion blender, get one! They aren't very expensive and so much easier to get out / clean than a regular blender. I use mine to make smoothies directly in the glass. Pretty nifty.

Easy Broccoli Soup
Makes 4 servings
2 heads broccoli, roughly chopped
1 onion, chopped
2 tbsp butter
1/4 tsp garlic powder [or 1 clove of the real deal, chopped]
3 tbsp flour
1 14oz can vegetable broth [you could also use chicken broth]
1.5 c water
1/2 c milk [I used 1%]
1/2 c shredded cheese [optional - I just think everything's better with cheese]

1. In a large saucepan, melt butter and saute broccoli, onion and garlic until onion is translucent, about 8 minutes. Stir to ensure even cooking.
2. Sprinkle flour over vegetables and cook about 3 more minutes until flour starts to thicken, stirring.
3. Add vegetable broth and water and bring to a boil. Cover and simmer over medium heat for 10 minutes.
4. Puree soup with an immersion blender. Stir in milk and cheese.

Monday, February 20, 2012

Super Shortcut Strawberry Banana Ice Cream


When I saw a recipe for two ingredient ice cream from Cookies and Cups on Pinterest, I knew it wouldn't leave my head until I made it.

Just cream and sweetened condensed milk. I mean, two ingredients? No ice cream maker?? No frozen solid brick of shudder-inducing ice crystals??? It couldn't be.

But it totally worked. The texture is soft and light. It tastes like real, homemade ice cream. It's a little on the sweet side, but it's so little work I don't feel I have the right to complain.


I whipped up a batch for my lovey on Valentine's day, because ice cream is his favorite food on the planet. It worked out much better than last year, when I tried to make a batch of 'healthy' valentine's day ice cream out of almond milk. It was a terrifyingly weird gritty slushy mess. I showed it to him so that he knew I tried, but I did not allow him to eat it.

This year went much better.


To make the strawberry heart, just slice a strawberry crosswise to get a circle, then trim it down into a heart shape. Plop it right on top before you freeze it. Cuteness!

[PS - I tragically don't have a stand mixer, so I used a hand mixer to whip the cream and it worked just fine.]

Super Shortcut Strawberry Banana Ice Cream
Ingredients:
[do not include vanilla]
1 pint strawberries
1 tbsp sugar
1/4 cup water
1 tbsp vodka
1 ripe banana

1. Cut strawberries and banana into bite sized chunks.
2. Mix strawberries, water and sugar in a saucepan. Bring to a boil then reduce heat to medium. Simmer for 10 minutes. Remove from heat and let cool completely.
3. Mix vodka into cooled strawberries [this helps prevent the liquid in them from freezing too hard].
4. Mix up ice cream according to recipe. Stir in strawberry mixture and bananas.
5. Pour into glass or plastic containers and freeze overnight.

Thursday, February 9, 2012

Caramelized Brussels Sprouts with Bacon, Balsamic & Brown Sugar


I love brussels sprouts.

I avoided them for a long time because of their terrible reputation. From movies, tv and general pop culture I associated them with those long parent-child torture sessions where they make you sit at the table for hours until you eat all your vegetables.

But then I tried them, and I loved them. They are quick and easy to saute. They taste great and have a nice little crunch. And they look like miniature Barbie-sized cabbages. What more can you ask for in a healthy vegetable?


So if we add a little brown sugar, a little balsamic vinegar, and a little bacon, things can only get better.


Gratuitous close up of brown sugar. Mmmmm.


I only recently realized you can buy bacon at the meat counter. I mean, single slice bacon purchase, where have you been all my life?? It's the perfect way to buy just a little bacon for a recipe and not be blessed with stuck with an entire package of bacon to use up. Maybe everyone already knew this. But I didn't.

This recipe makes a side serving for two people [the amount in the bowl is one serving]. So if you need more, just double and triple as needed. It would be a great side for a romantic V-day dinner! Also if you'd like it to be vegan/vegetarian, just omit the bacon and start right with sauteing the sprouts, it'll still be pretty good. I haven't tried it with veggie bacon, I have a feeling it just wouldn't be right. But try if you're braver than me.


So here's what I did [recipe follows at bottom]. First, cut off the bottom of each Barbie cabbage, then cut it in half lengthwise. The outermost little leaves will fall off. It's ok.


Then rinse thoroughly. I do this after cutting because we're getting rid of the outer layers anyway, so why spend time washing them?


Then dice the bacon and saute it in a skillet at medium high heat until just crisp. Pour out the bacon and grease onto a paper towel to drain.

Whoops, no picture. We all know what cooking bacon looks like, right?

Now heat olive oil in the skillet. Place all the sprouts with the cut sides down into the pan. Sprinkle with brown sugar. Saute at medium low heat for about three minutes, until bottoms start to caramelize and tops start turning a darker, vibrant green.


Pour vinegar over sprouts. I usually pour two turns of the pan. After the vinegar sizzles around for thirty seconds, flip all the sprouts over. Tongs are the best tool for this.


Take a second to admire the pretty colors. After another minute of cooking, add the bacon back in. Toss and cook for another 30 seconds.


Turn out into a bowl and serve.


Caramelized Brussels Sprouts with Bacon, Balsamic & Brown Sugar
makes 2 side servings
Ingredients:
1/2 lb brussels sprouts
2 slices bacon
1-2 tbsp olive oil
1 tbsp brown sugar, not packed
2 tbsp balsamic vinegar
salt to taste

1. Cut off the bottom of each sprout, then slice in half vertically. Rinse.
2. Dice bacon. Saute bacon in skillet over medium heat until just crisp. Reserve bacon. Pour off drippings.
3. Heat olive oil in skillet. Place sprouts in skillet, cut sides down. Sprinkle with sugar. Saute over medium low heat for about 3 minutes or until bottoms start to caramelize and tops start turning bright green.
4. Pour vinegar over sprouts and shake pan to distribute. Cook for 30 seconds. Turn all sprouts over and cook for another minute.
5. Add reserved bacon to sprouts. Toss and cook for 30 seconds. Salt to taste if necessary [I usually don't add salt, remember the bacon is already salty]. Serve.

Friday, January 27, 2012

Super Bowl Cupcakes Decorating Tutorial


I'm not gonna lie. I was never very into sports.

This is probably due to three factors: 1] Neither of my parents are very into sports, 2] I was never very good at sports myself and 3] I grew up in a city with no major sports teams. The biggest thing in Toledo is our minor league baseball team, the Toledo Mud Hens.

I mean, their mascot is a little chicken that lives in the mud.

Monday, January 9, 2012

Brandied Crock Pot Applesauce


One of my favorite Christmas presents I opened this year was a countertop apple peeler.


I mean, this thing is awesome. Poke a big juicy apple onto the metal forks, crank the handle, and in about thirty seconds a whole apple is peeled, cored and thinly spiral sliced.


The fact that it's purely mechanical and works without power makes it even cooler somehow.


It's just a bright little spot of culinary human ingenuity for a task that NO ONE likes to do.


The best part about it might be the apple peel ribbons left over when you're done. It makes me wish I still had horses. They would go nuts for them.


They also make me think of linguine. Apple linguine in a caramel sauce, anyone?

So needless to say, with this apple peeler and the lazy cook's best friend, a crock pot, this applesauce recipe took almost no effort. And it's delicious. And it makes your house smell amazing while it's simmering. Serve it alongside pork or latkes. Spoon it over oatmeal, pancakes, or ice cream. Shovel it into your mouth directly from the crock pot. Your choice.


Brandied Crock Pot Applesauce
Ingredients:
3 lbs apples [about 8 medium]
1/4 c brown sugar
1 tsp cinnamon
1 tsp lemon juice
generous pinch ground gloves
generous pinch kosher salt
1/4 c water
1/4 c brandy

1. Peel and chop the apples into chunks.
2. Mix everything together in a crock pot. Cook on low for 4 hours or until apples start to fall apart. Mash a little with a wooden spoon and enjoy.

Tuesday, December 20, 2011

Healthy Honey Pumpkin Pie


Sometimes, I go running.

By running I mean that I make quite a deal of stretching, and clipping/tying/headbanding my hair back, and stretching again, and then begrudgingly huffing around my neighborhood for a little while. I'm still waiting to get addicted to exercise like I hear is allegedly possible.

But even after only a few embarrassing low-key workouts I already find myself wanting lots of vegetables and water. It's weird. I start trolling Pinterest for brussel sprout recipes.


So then what, I go and screw everything up by baking a pumpkin pie? But wait, listen! This pumpkin pie filling is almost completely made up of good stuff! No cream, cream cheese, whole milk. Barely any butter. Mostly pure pumpkin, yogurt and whipped egg whites.

As usual, greek yogurt, my favorite faux fat ever, makes an appearance. It lends a rich, fat-free creaminess with a ton of protein to boot. [I still don't understand how they do it.] Whipping the egg whites separately then folding them in makes the pie light, airy and fluffy. The tang of the yogurt is tempered by the sweetness of the honey. You could use agave syrup instead of the honey if you want, or even all the sugar, but I just didn't have any on hand. I'd eliminate the milk if you do all agave.


Now I'm not going to go crazy and say this tastes exactly like a no-holds-barred full fat pumpkin pie. [If you're looking for that, check out my Guinness Pumpkin Pie recipe.] But it's pretty darn close, and SO much of the bad stuff is gone. It would be even better for you if you didn't eat the crust, but I wouldn't dare blaspheme to that extent. Just letting you know it's an option. [We all have our limits.]


**NOTE:: My pie recipes are for a 9.5" pie dish, which is slightly bigger than average. If you're using an 8" or 9" pie plate, you'll have a little filling left over, which I would highly recommend pouring into a ramekin and baking along with the pie [it'll probably be done in half the time]. That way you can taste test your filling without cutting into the real deal. Plus why wouldn't you want a little pre-pie?

UPDATE: I had to close comments on this post because for some reason it was getting tons of spam. If you have a question feel free to email me! My email is listed in my *About* page.

Healthy Honey Pumpkin Pie
Ingredients:
1 28oz can pumpkin
1 c nonfat plain greek yogurt
1/2 c sugar
1/2 c honey
2 tsp cinammon
1 tsp vanilla
1 egg yolk
1/2 c lowfat milk
2 tbsp melted butter
1/2 tsp kosher salt
pinch nutmeg [or up to 1/4 tsp if you like nutmeg, I don't really]
3 egg whites
1 unbaked pastry pie crust

1. In a large bowl beat pumpkin and yogurt until well combined. Add the rest of the filling ingredients EXCEPT the egg whites and beat until well combined.
2. Rinse your beaters. In a medium bowl beat egg whites until soft peaks form, about 5 minutes.
3. Gently fold the beaten egg whites into the pumpkin mixture until well distributed.
4. Pour filling into pie crust. Bake at 425 F for 15 minutes. Reduce heat to 350 F and bake for an additional  hour to an hour and 10 minutes until filling is just set. [It definitely took longer than a regular pumpkin pie.]
5. Turn oven off and leave oven door cracked. After half an hour remove pie and cool completely.

Wednesday, December 14, 2011

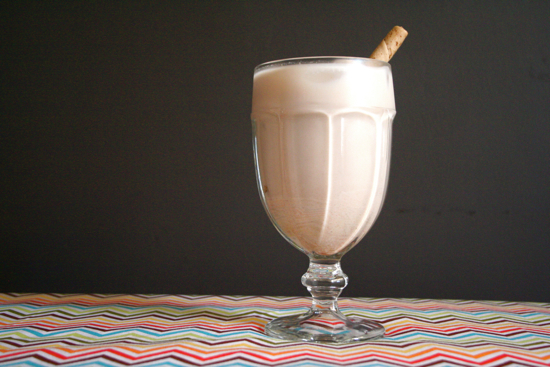
Nutella White Russian


I have a confession to make. There was a time in my life when I did not like Nutella.

To me, the chocolate and hazelnut spread that drives everyone into frenzied exuberance just tasted like frosting that someone ruined by adding nuts to it.

But then on a whim, I mixed it with peanut butter on my morning toast. And I saw the light. I will now admit to having eaten Nutella straight from the jar with a spoon. I am not ashamed.


This drink is like chocolate milk for grownups. There isn't any actual Nutella in it [I thought that would turn into a chunky sludgy mess] but all the flavors are there. The hazelnut Frangelico, chocolate sauce and half & half form a most deliciously creamy Nutella flavored libation.


I cut my half & half with milk because I wasn't into the idea of just sitting down and drinking a glass of half & half. But feel free to go with a higher half & half to milk ratio if that's your style. It would also be easy to make dairy free with soymilk or - I bet even yummier - almond milk!


Nutella White Russian
Ingredients:
1.5 shots Frangelico
.5 shot vodka
.5 shot chocolate syrup
1 shot half & half
ice
milk
hazelnut pirouette cookies [optional]

1. Mix the Frangelico, vodka, chocolate syrup and half & half in a tumbler. Add a few ice cubes and top off with milk. Stir thoroughly and garnish with a cookie.

Wednesday, November 23, 2011

Polka Dot Pie


And continuing with the pie season theme...

This is more a pie crust idea post than a recipe feature, although there is a recipe at the end. I like to try to come up with new ways to vent the top of a double crusted pie besides the usual old slits. The top crust can be cut in any way you want as long as there is a place for the steam to escape.


So for my thanksgiving contribution this year, I made an apple cranberry pie and cut polka dots in the top crust. It looks really cute and all it took was a water bottle cap! I started by lightly scoring a 2" grid on my top crust with a ruler, because I'm a nut and I wanted to make sure the dots were all aligned.


Then I cut dots in alternating rows with the bottle cap and put the top crust on the pie as per usual.


So much more interesting than just the slits! If you want some more inspiration for your own pies, you can also check my plaid lattice top Bourbon Peach Pie with Cornmeal Crust:


or my Maple Blackberry pie, with a diagonal cut design:


Don't be afraid to get creative. Happy thanksgiving!

Apple Cranberry Pie
ingredients:
5 granny smith apples
1 cup cranberries, washed and rinsed
1/2 c sugar
1/2 c brown sugar
1/2 c flour
1 tsp cinnamon
1/4 tsp ground cloves
1/2 tsp vanilla [I used vanilla bean paste]
generous splash[es] of brandy
2 tbsp salted butter
2 unbaked pie crusts

1. Peel and chop apples. Mix them in a bowl with the cranberries, sugars, flour, spices, brandy and vanilla.
2. Pour filling into unbaked bottom crust. Dot the top with the butter Top with second crust. Slit or cut to vent. Brush top with milk and sprinkle with sugar. Put foil around edge of pie to prevent crust from burning.
3. Bake at 375 for 30 minutes. Reduce heat to 350 and bake another 30 minutes. Remove and let cool completely.

Friday, November 18, 2011

Cranberry Meringue Pie


It's my favorite time of year. It's pie season.

In case you haven't already noticed, I love pie. I just love it. And starting from now until the glorious end of December, I can make a pie every day without any justification. It's simply pie season.


So I thought I'd try a thanksgiving pie that departed slightly from the usual old apple or pumpkin [though don't be alarmed, I love both of those pies too. Guinness pumpkin pie anyone?]. I wanted something with a little more color and zing. Thanksgiving involves a lot of brown and white foods. Turkey. Mashed potatoes. Stuffing. Apple pie. Pumpkin pie. Brown, beige, tan. So then I though, how about cranberries? and meringue?! I've never heard of that before! How revolutionary!


After a few internet searches I was dismayed to see that I was far from the first to think of that idea. Most of the recipes I saw, however, involved making some sort of cooked curd filling, like a lemon meringue pie. I didn't want that. I wanted something a little simpler.


So this is basically a pared down cranberry salad recipe in a cinnamon crust, topped with fluffy meringue. Apart from simmering the cranberries for a few minutes there's no cooking for the filling. It's pretty easy. The color of the cranberries is so saturated and gorgeous, it almost looks fake, and when it's next to the snowy white meringue it's really pretty beautiful.


There are a lot of ways to take shortcuts with this. You could use a premade crust if you wanted. You could skip the meringue and just top the pie with a cloud of whipped cream [chill the pie overnight and add the whipped cream just before serving]. You could skip the topping all together. The next time I make this, I might try a pre-baked pastry pie crust. The filling easily soaked through the graham cracker crust and while it didn't affect the taste, it made it a little sloppy and soggy.

But no matter which way you choose to make it, this pie puts a full thanksgiving pie revolution well within your grasp. It's tart and sweet and not what anyone will expect.


Cranberry Meringue Pie
for the crust: 
1 sleeve of crushed graham crackers
1/4 c sugar
6 tbsp melted butter
1 tsp cinnamon
1/4 tsp ground cloves
for the filling:
1 12oz bag cranberries
1 orange, zested and sliced
1 c sugar
1 c water
1 20oz can crushed pineapple, drained
1 3oz package raspberry jello 
(there is a seasonal cranberry jello that would work better, but my store didn't have it)
1-1.5 c boiling water
for the meringue:
4 egg whites, room temperature
1/4 tsp cream of tartar
6 tbsp sugar
1/2 tsp vanilla

Make the crust:
1. Combine all crust ingredients. Mix well. Press into a 9" or 9.5" pie pan. Bake at 375 F for 7 minutes. Remove and cool completely.

Make the filling:
1. In a saucepan combine cranberries, orange zest, 1 c sugar, and 1 c water. Bring to a boil then reduce heat to medium. Simmer for 10 minutes.
2. Remove from heat and strain out the liquid, reserving it in a measuring cup. In a large bowl mix cranberries with orange slices and pineapple.
3. Add enough boiling water to reserved cranberry liquid to make 2 cups. Add the jello to the liquid and stir until dissolved.
4. Mix jello with cranberry, oranges and pineapple. Pour filling into cooled pie crust. Refrigerate for 6 hours or overnight until set.

Make the meringue:
1. In a large bowl, beat egg whites and cream of tartar until foamy.
2. Add the sugar 1 tbsp at a time, beating on high. Beat until stiff peaks form and mixture is glossy. Beat in vanilla.
3. Spread meringue over top of cooled pie. Be sure to spread it to the crust all the way around so that doesn't shrink while baking.
4. Bake at 400 F for 8-12 minutes until meringue is browned. Remove, cool and refrigerate before serving.
[Make sure this baby is chilled thoroughly before slicing! I made the mistake of slicing while it was still a little warm from the meringue bake, and the whole thing just kind of melted.]

LinkWithin

Related Posts with Thumbnails